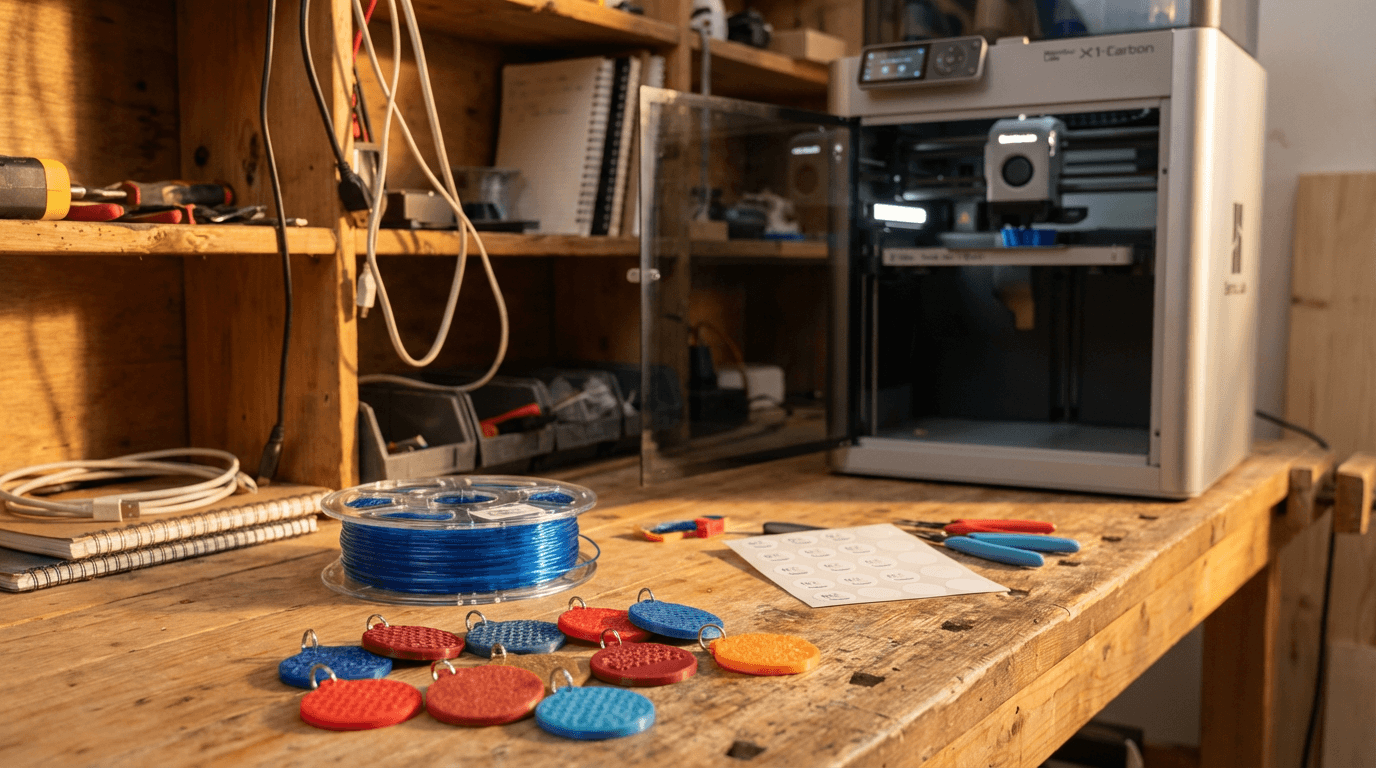
3D Print Your Own NFC Pet Tag (Or Let Us Make It)

If you own a 3D printer, you've probably printed everything from phone stands to lithophanes. But here's one that actually matters: a custom NFC pet tag for your dog or cat, linked to a live digital profile that anyone can tap to reach you.
This guide covers everything - choosing the right material, embedding an NTAG215 chip, sealing it properly, and registering it on FoundYa so it actually works. We'll also pull back the curtain on how we make our own tags, because we reckon transparency beats marketing speak.
What you need
The shopping list is short:
- A 3D printer - FDM is fine. Any printer that handles TPU will do. If you're sticking with PLA or PETG, basically any printer works.
- Filament - PLA, PETG, or TPU depending on how rugged you want it (more on this below).
- NTAG215 NFC stickers - the same chip used in Amiibo cards. Grab a pack from Amazon or AliExpress for a couple of dollars each. The 25mm round sticker format fits most tag designs perfectly.
- Dichloromethane (Dichtol) - for chemical welding PETG layers into a watertight seal. Only needed if you're printing in PETG.
- A tag model - design your own, or download one of ours from the Tag Designer as a 3MF file ready for slicing.
Choosing your material
A pet tag lives a rough life. It dunks into the water bowl a dozen times a day. It drags across pavement when your dog flops down for a rest. It clinks against the metal registration tag and the D-ring on the collar. It bakes in the sun on a summer walk and gets soaked in the rain on a winter one. It goes through baths, mud, sand, and the occasional chew from a bored puppy.
Not all filaments survive that equally.
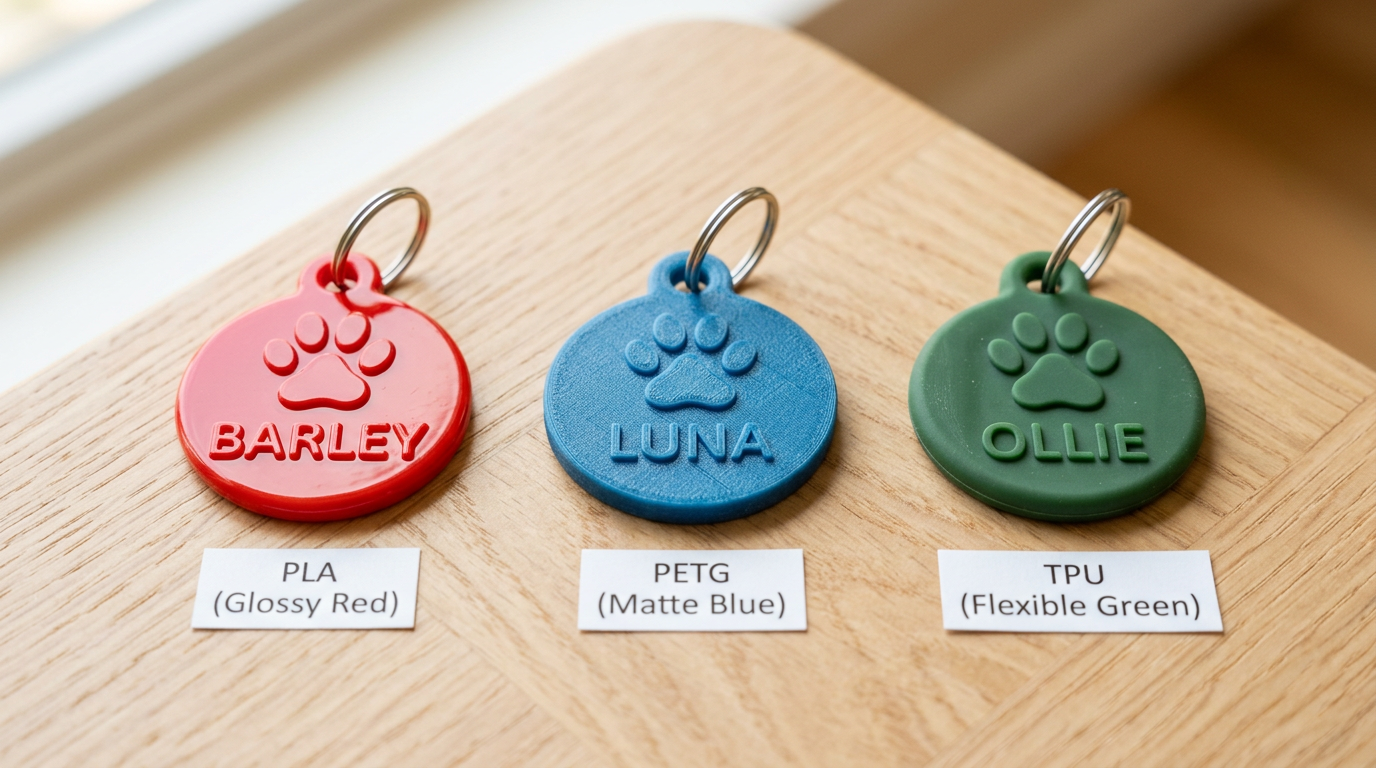
PLA - the easy option
PLA is the most forgiving material to print with. If you've never printed anything flexible or exotic, start here.
Pros:
- Prints on any FDM printer with no special setup
- Crisp, sharp detail - raised text and QR codes come out clean
- Huge colour range so you can match your pet's collar or go wild
Cons:
- Brittle compared to PETG and TPU - a drop onto tiles or concrete can crack it, and edges may chip over time from clinking against metal D-rings and registration tags
- If a collar gets left outside in the elements for an extended period (forgotten on a fence post, left in a hot car for hours), PLA can soften or warp. In normal use on a dog, this isn't really an issue - if your dog is out in 40°C+ heat, the tag is the least of your worries
- Layer lines can wick moisture over time if the tag isn't sealed - gradual weakening rather than sudden failure
- UV will fade the colour and chalk the surface eventually, but this takes months of sustained outdoor exposure, not everyday walks
Verdict: Genuinely fine for most pets. PLA gets a bad rap in the 3D printing community, but for a tag that lives on a collar and comes inside with the dog, it holds up well. It's the easiest to print and gives the sharpest detail. The main reason to step up to PETG or TPU is if you want something tougher against impacts or properly waterproof.
PETG - the balanced middle ground
PETG is tougher than PLA, handles heat and moisture better, and - critically - responds beautifully to dichloromethane solvent welding.
Pros:
- Absorbs impacts instead of cracking - the clinking and scraping that chips PLA barely marks PETG
- Heat-tolerant up to ~80°C, so summer sun and hot car pickups aren't a concern
- Dichloromethane fuses the layer lines into a near-solid piece, which means water bowl dunks, rain, baths, and puddles stay on the surface instead of seeping in
- Good detail on raised text and inlaid features - not quite PLA-sharp, but close
Cons:
- Still a rigid plastic - it won't crack easily, but it doesn't flex if it catches on a fence or gets wedged between rocks
- Raised text and edges will gradually round off from months of scraping against the ground and other tags
- Stringing during printing can be annoying to dial in (though this doesn't affect durability, just print cleanup)
Verdict: A solid everyday choice. A Dichtol-sealed PETG tag handles real-world collar life well - it just won't flex the way TPU does if something catches it.
TPU - the rugged option
TPU is a flexible thermoplastic that feels like hard rubber. It's the toughest of the three and a popular choice for tags that need to handle the most punishment.
Pros:
- Flexes and bounces back - catching on a fence, getting stood on, or being chewed doesn't crack it. It just bends and returns to shape
- Quiet on the collar - no hard clinking against metal tags, just a soft tap
- Naturally water-resistant without sealing - daily water bowl exposure, baths, rain, even ocean swims are fine
- Comfortable against your pet's neck and doesn't rub or irritate
- UV-stable - holds colour and shape in prolonged sun exposure far better than PLA
Cons:
- Harder to print - requires a direct-drive extruder and slower print speeds (bowden tube setups usually can't handle it)
- Fine detail is softer - small text, thin QR bars, and sharp edges won't be as crisp as PLA or PETG. The flexibility that makes it durable also rounds off sharp features
- Raised text wears smooth faster than PETG because the softer material abrades more easily against concrete and gravel
- Limited colour range compared to PLA
Verdict: If your printer can handle it, TPU is the most durable option. The trade-off is softer detail and a harder print, but it'll take the most abuse of the three.
Embedding the NTAG215 chip
The NTAG215 is an NXP-made NFC chip with 504 bytes of user memory - enough for a URL, a vCard, or both in hybrid mode. It's the same chip inside Nintendo Amiibo, which means it's mass-produced, dirt cheap, and well-supported by every modern smartphone.
Why NTAG215 specifically?
- 504 bytes - enough for FoundYa's hybrid NFC mode (cloud URL + offline vCard)
- Password protection - the chip supports a 4-byte password and 2-byte acknowledgment (PACK), which FoundYa uses to lock your tag so nobody can overwrite it
- 100,000+ read/write cycles - it'll outlast the tag itself
- No battery - powered by the scanning phone's NFC field
- Universal compatibility - works with every NFC-enabled phone made in the last decade
How to embed it
The trick is pausing the print mid-way and dropping the sticker in.
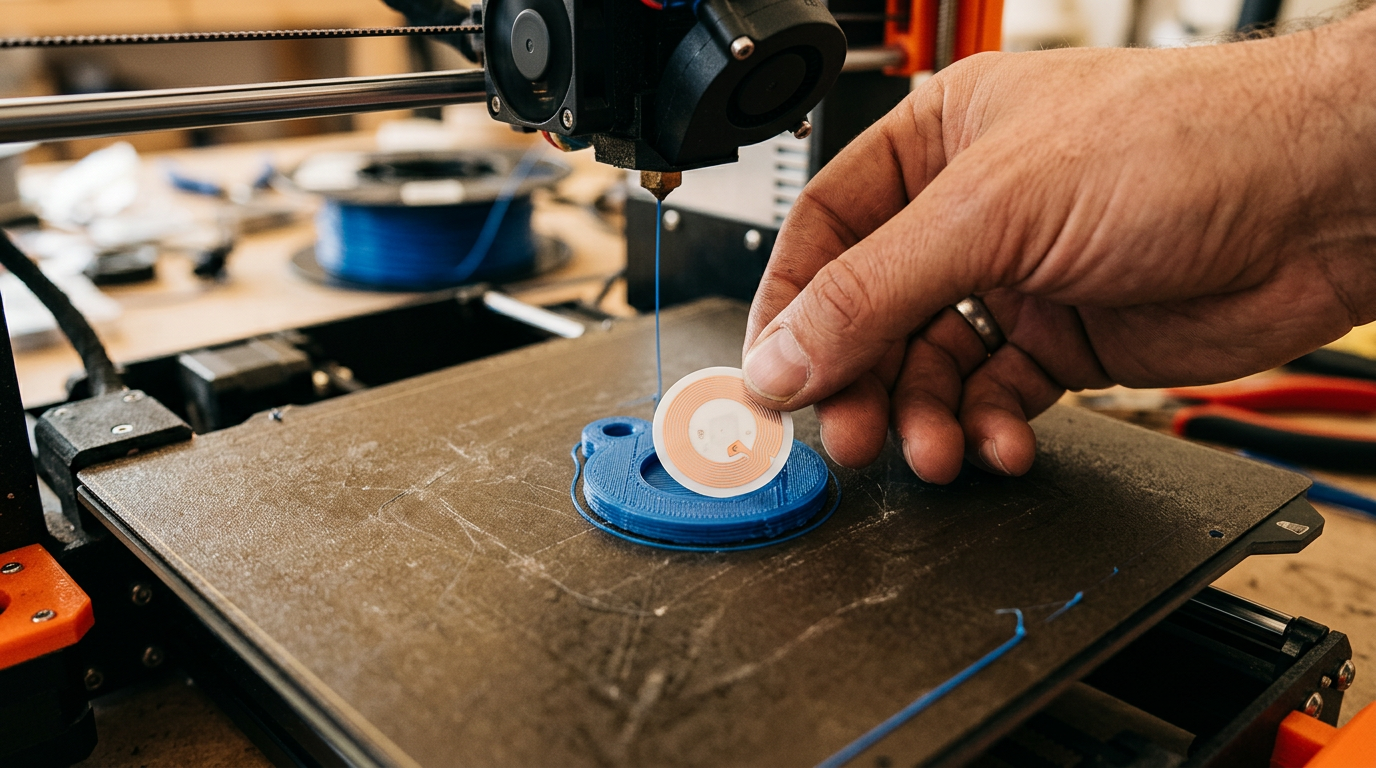
- Design your tag with a recess - our 3MF exports include a cavity sized for a 25mm NTAG215 sticker. If you're designing from scratch, create a circular pocket about 0.4mm deep on the back face.
- Slice normally and note the layer height where the recess floor finishes. For a 3mm-thick tag with a 0.4mm recess, that's around layer 13 at 0.2mm layer height.
- Add a pause at that layer in your slicer (Bambu Studio, PrusaSlicer, and Cura all support this).
- When the printer pauses, peel the NTAG215 sticker backing and press it into the recess, antenna-side down. Make sure it's flat and centred.
- Resume the print - the next layers seal over the top, encasing the chip inside the tag body.
Test the NFC sticker with your phone before embedding it. Tap it, confirm it reads, then embed. Finding out a sticker is dead after it's sealed inside a printed tag is properly annoying.
Sealing with dichloromethane (Dichtol)
Dichloromethane is a solvent that partially dissolves PETG and certain other plastics, then re-bonds as it evaporates. The result is a chemical weld - not a surface coating, but a fusion of the layer lines themselves.
Why bother?
FDM prints have micro-gaps between layers. Water, dirt, and sweat seep in over time. For a pet tag that lives on a collar through rain, mud, baths, and the occasional ocean swim, those gaps are a failure point. Dichtol eliminates them.
The process
- Print your tag in PETG (Dichtol doesn't work well with PLA and is unnecessary with TPU which is already water-resistant).
- Work in a well-ventilated area. Dichloromethane is a serious solvent - use it outdoors or with proper extraction. Wear nitrile gloves.
- Apply Dichtol with a small brush to the outside surfaces of the tag. Work quickly - the solvent evaporates fast.
- One thin coat is enough. The surface will go slightly glossy as the top layer softens and re-fuses. Don't pool it or you'll lose surface detail.
- Let it cure for 24 hours before handling. The bond strengthens as residual solvent evaporates.
Dichloromethane is toxic if inhaled in concentration. Always use it in a ventilated space, wear gloves, and keep it away from food and pets. Read the safety data sheet before your first use.
What about TPU?
TPU is naturally water-resistant and flexible enough that layer adhesion is already excellent. Dichtol isn't needed for TPU - the material handles moisture on its own. If you're printing in TPU, skip this step entirely.
How we make FoundYa tags
We're not gatekeeping the process. Here's exactly what happens when you order a tag from us:
- You design it in the Tag Designer - pick a shape (classic round or bone), choose your material, choose colours from our filament palette, add your pet's name, an icon, and optionally a QR code.
- We review the design before printing. The Tag Designer does a good job, but occasionally a long name, unusual character, or tight layout produces something that won't print cleanly. We check every order and fix minor issues (spacing, overlap, text fitting) before it goes to the printer. If something needs your input, we'll get in touch.
- We generate the 3MF - the design parameters produce a multi-colour 3MF file with proper material assignments. Base colour, text colour, accent pieces - all mapped to real filament spools.
- We print it in whatever material you chose - PLA, PETG, or TPU - with an AMS (Automatic Material System) handling colour changes automatically.
- We embed an NTAG215 at the pause point, pre-programmed with your tag's unique scan URL and password-protected so only you (via FoundYa) can modify what's stored on the chip.
- We seal with Dichtol where the design uses PETG - fusing the layer lines for a waterproof finish.
- We verify end to end - NFC tap, password verification, scan URL loads the correct profile, and a visual inspection of the print quality. If anything fails, we reprint it. Nothing ships until it works.
- We provision the tag UID in our system, password-protect the chip, and add it to your household ready for you to claim and link to a pet - all included in the price.
- We ship it ready to tap straight out of the box. Open it, claim the tag in the app, link it to your pet, done.
The whole point of offering 3MF downloads is that you can do steps 1-5 yourself. The platform doesn't care whether we made the tag or you did - once it's registered, it works identically.
Registering your tag on FoundYa
Whether you printed the tag yourself or pulled an NTAG215 sticker out of an Amazon 10-pack and stuck it on an existing collar, the registration process is the same.
Activating your UID
Before you can register a BYO tag, you need to purchase a UID activation. This reserves a slot for your tag's unique chip ID in our system - it's a one-time fee of $5 and it's yours for life.
We charge this for a practical reason: every UID we provision takes up space in our infrastructure and gets a dedicated scan URL, cloud profile, and push notification pipeline. Without a nominal fee, there's nothing stopping someone from bulk-registering thousands of UIDs they'll never use. The activation cost keeps the platform sustainable and the money goes directly towards running the service.
If you order a tag from us, activation is included in the price - you don't pay it separately.
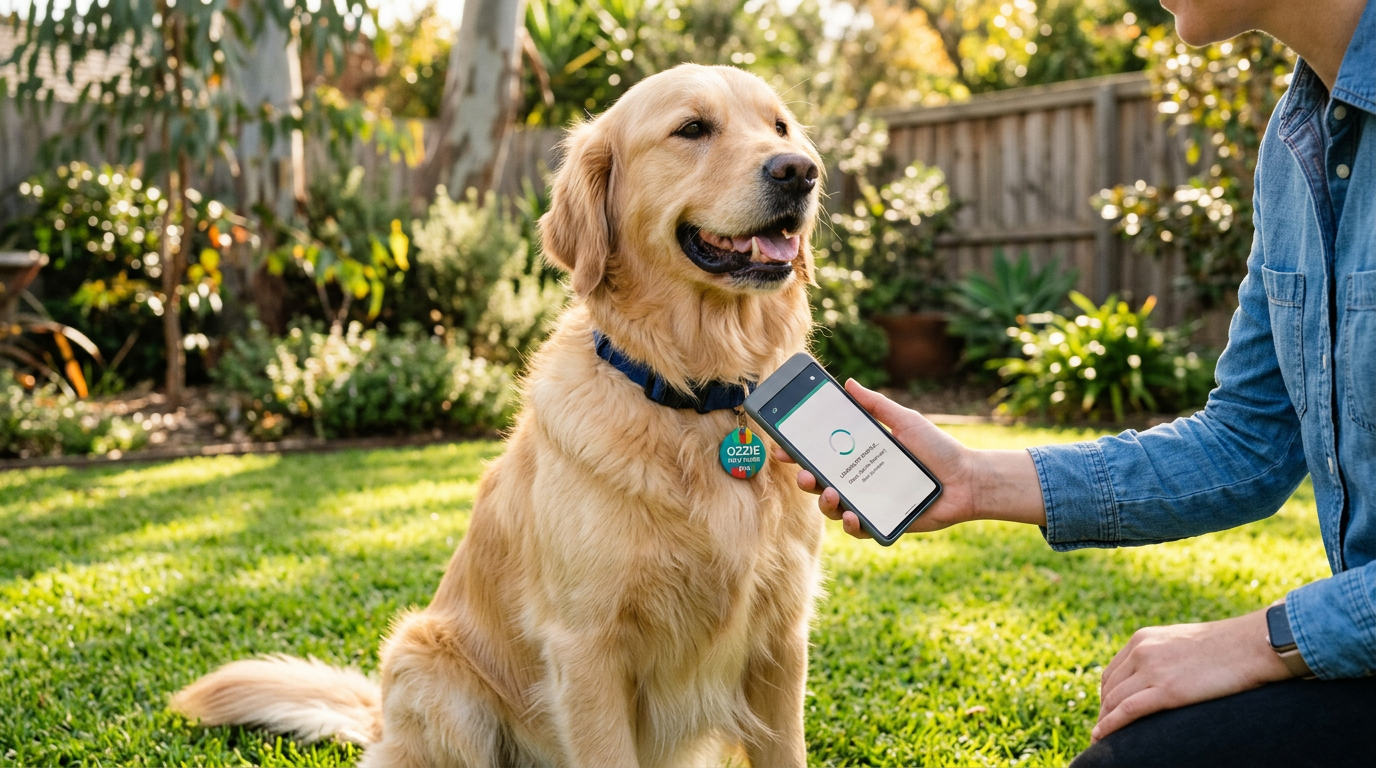
From the mobile app (recommended)
- Sign up at foundya.pet and download the app
- Add your pet - name, photo, breed, and any medical details you want on file
- Go to the Tags tab and tap Register Tag
- Purchase your UID activation - a one-time $5 fee to reserve your tag's chip ID in our system
- Hold the tag against the back of your phone - the app reads the chip's unique UID automatically
- The app writes FoundYa's scan URL to the chip, sets up hybrid NFC mode (cloud profile + offline vCard), and password-protects the chip
- Link to your pet - choose which pet this tag belongs to
- Done. Anyone who taps that tag now sees your pet's profile instantly - no app needed on their end
From the web dashboard
If you'd rather not use the app, you can register manually:
- Go to Dashboard > Tags > Register Tag
- Purchase your UID activation (same $5 one-time fee)
- Enter the tag's UID - it's the 14-character hex string starting with
04that any NFC reader app can show you - Choose your NFC mode and link to a pet
The mobile app is better for this because it handles the NFC write (URL + vCard + password) in one tap. If you register via web, you'll need a separate NFC writing app to program the chip's NDEF records yourself.
FoundYa works with any NFC chip, but NTAG215 is what we recommend and test against. It has the right memory size for hybrid mode and supports the password protection we use to lock your tag. Cheaper NTAG213 chips work for cloud-only mode but don't have enough memory for the offline vCard.
The "BYO tag" philosophy
We could lock the platform to our hardware and charge a premium. We chose not to. The FoundYa platform is the product, not the plastic on your pet's collar.
A $2 NTAG215 sticker from Amazon plus a $5 activation fee, and your pet has a digital profile that anyone can tap. No app download for finders. Instant notifications with GPS when someone scans it. Lost mode with community Sentinels when things go wrong.
If you want the full hardware experience - a custom-designed, multi-colour tag printed and sealed by us in PLA, PETG, or TPU - we make that too. But we'll never hold your pet's safety behind a hardware paywall.
Tips from our print room
A few things we've learned printing thousands of tags:
- Slow down for TPU. We print at 25mm/s with a direct-drive extruder. Bowden tubes and TPU don't mix well.
- Use a brim for small tags. A 30mm round tag has minimal bed contact. A 3mm brim prevents it lifting mid-print.
- Test NFC range after printing. Different materials and thicknesses affect read distance. PETG and PLA are radio-transparent. TPU is fine too, but thick TPU (5mm+) can reduce range slightly - keep the chip as close to the surface as practical.
- Print the QR code as an inlay. If your tag has a QR code, print it as a contrasting-colour inset rather than relying on surface detail. Our 3MF exports handle this automatically with multi-colour material assignments.
- Label your test tags. If you're iterating on designs, write the settings on painter's tape and stick it to each print. Future you will thank past you.
Get started
Ready to print your own? Head to the Tag Designer to create a design and download the 3MF, or sign up to register a tag you've already made. If 3D printing isn't your thing, you can order a finished tag from us - same design, same platform, we just handle the printing.
For more on why NFC beats QR codes for pet identification, see our NFC vs QR comparison.